Posted on

How to make your own Dough Ornaments at Home!

Personalized First Christmas Bear Ornaments

Make Your Own Custom Ornaments

Often called salt dough or bread dough, we call our completely handcrafted Christmas tree decorations “Dough Ornaments”. There are many ways to make dough ornaments and many recipes. This is how we’ve been creating them for 37 years!

Calliope Designs recipe for Dough Ornaments

1 cup all-purpose flour
½ cup salt
½ cup water

For a natural color dough, mix these ingredients together, then knead the dough for at least 10 minutes. The desired consistency is a smooth dough, similar to real bread dough – not too sticky, not to dry. The exact portions of flour, salt and water are not as important as the consistency of the dough – so if it’s too sticky add more flour, if it’s too dry add more water.
Place the dough in a plastic bag and protect it from getting dried out.
If you like to work with the natural colored dough, after the ornaments are formed and baked, you can paint them with acrylic paints.

For colored dough, you can use liquid or paste food coloring which should be added to the liquid measurement, then mixed into the dry ingredients. If you have access to powered nontoxic paints such as the type school children use, mix the dry color into the flour and salt mixture before adding water.
Experiment with different amounts of color. In general, the wet dough will be the color of the finished ornament after it is baked and glazed.

There are many ways to form the ornaments, and many books have been written on the subject. Many common household tools are used to make dough ornaments. A kitchen knife, garlic press, toothpicks, and dough roller are a few.

When your dough ornaments have been formed we recommend you bake them in a 225-degree oven until they are completely hardened. Sometimes this can take all night! They will not burn at this temperature. They have to be thoroughly dried through and through in order to be preserved.
After the ornaments are baked/dried and cooled it is time to glaze them. We prefer a shiny coating and so we use a high gloss polyurethane, and we dip our ornaments. We give them at least 4 coats of polyurethane, letting them dry for at least 24 hrs. between each coating. We trim off the drips using a sharp knife or razor blade.

Always store your dough ornaments in an airtight container in a dry place inside your home. No attics or basements, please! You can personalize them too using a fine tip permanent marker.
By the way, we learned how to make dough ornaments at a Christmas party at the home of John and Kathleen Holmes, Mill Valley, California! It was a really fun evening!

Calliope Designs Custom Ornaments Are The Perfect Gift For Any Occasion

Celebrate any occasion with a personalized ornament from Calliope Designs. View all our amazing and diverse designs on our online shop today!

Posted on

Today’s a Good Day to Shop for Custome Ornaments From Calliope Designs!

Cheerleader: Black Uniform, Personalized christmas Ornament

Why You Should Shop Custom Ornaments Today!

Today is  Sunday, October 6th, 2013, and it’s a good day to shop for your family’s personalized ornaments for the upcoming holiday season!  I’ve just been informed by the men in my family that there are 14 hours of televised professional football today.  And while there are probably lots of fun things the non-football viewing population can do other than shop, we at Calliope Designs notice that when the big football games come on TV the orders start coming in on our website. Maybe football means Fall and the holidays approaching.  Maybe it’s just having some free time.

I hesitate to make a general statement that’s gender-oriented – there are many women who love football and the games and parties!  And there are many men who like to shop for personalized ornaments!  Whoever sends in the orders is enjoying a nice relaxing session of online shopping, choosing just the perfect ornament for each family member, personalizing it with care, and getting absolutely the best selection available before the rush of the holiday season.  All of our new products are entered and pictured.

If you’re not ready to shop for Christmas perhaps you’d enjoy a project of making some ornaments with your kids.  Be sure and search our blog for How To Make Your Own Dough Ornaments at Home post.  What a fun project, inexpensive materials, great results…. and not too messy in the kitchen.  This means everyone’s having fun doing something they love on this Sunday afternoon.

Handmade Custom Creations for a Great Cause from Calliope Designs

It’s a drop dead gorgeous day in California and I plan to attend the Calabash Festival in Forestville CA.  It’s a benefit for Face to Face, a food resource for HIV/AIDS patients in the county.  Over 100 artists have created beautiful items from gourds of all shapes and sizes.  Some are painted.  Some are carved.  Some are created into toys, others into beautiful decorative pieces.  There is jewelry and there are hats.  It’s amazing and fun and fanciful… and for a good cause.  So I’ll miss the football games today.

Posted on

DIY Ornaments for your Christmas Tree

I’m always on the lookout for fun projects to do with children at Christmas time. Of course, making your own ornaments to the tree is one of the best activities – the ornaments are original, cute, and then you can PERSONALIZE them with the child’s name and the year. As the years pass you’ll have the fun of getting these ornaments out and remembering the time making them as you hang them on the tree each year. Here are some novel ideas from Raquel Fagan who gathered ten DIY ideas. We’ve put links in the article to the author of each idea, and to the tutorial so you can get the best instructions. Thank you to all 10 creative individuals!!!

List from Raquel Fagan

Decorating the Christmas tree is a beloved tradition for many families. This year, try adding a new tradition to your holiday repertoire – making your own decorations. These 10 homemade ornaments are so fun and festive, you’d never guess they’re made from trash!

1. Eggshell baubles: Use empty egg shells to create bauble ornaments light enough to adorn even the smallest branches.

The next time you’re whipping up a morning omelet, don’t compost those egg shells. Turn them into enchanting baubles for your Christmas tree instead! Empty eggshell baubles are as elegant as store-bought ornaments but light enough to adorn even the smallest of branches.

Use a drill with a 1 or 2-millimeter bit to penetrate the eggshell, cook up the egg and decorate what’s left, like Lachlan.Rogers.Name blogger Lachlan Rogers. As he explains in his detailed tutorial, Rogers experimented with permanent marker, paint and even nail polish on the decorative eggs. But if you plan to compost your ornaments after the holidays, stick to non-toxic and water-based markers and paints instead.

2. Holiday card ornaments

Recycled holiday cards make perfect ornaments: sparkly and elegant yet impossible to break. With this quick and easy tutorialfrom Martha Stewart, you can turn all your holiday cards into eye-catching globes and circles that lock together to compliment your tree. All you’ll need is a hole punch, some scissors and some thread.

3. Sock owl ornament: Use those single socks to create a fun stuffed owl for your holiday tree. Just sew a loop onto the top or back of your owl for hanging.

Most of us have at least a few socks without mates laying around. Rather than tossing them in the trash, use them to create this fun sock owl craft
from Whimsy Loft blogger Grace. You’ll need to break out the sewing kit for this one, too. But the finished product is so cute, it’s worth the love and labor. Just sew a loop on the top or back of the owl to transform your craft into a spunky holiday ornament.

4. Upcycled tie wreath

If you’re in search of a truly unique decoration to spice up your tree or front door, look no further than this upcycled tie wreath from Good Housekeeping. Turn Dad’s old ties into an eclectic holiday wreath that’s bound to be the coolest on the block. This one requires a little sewing. So, it’s best for adults and older kids.

5. Plastic bottle stars Use the base of plastic water, juice or olive oil bottles to craft festive star ornaments that reflect the light from every direction.

Have a recycled holiday with wintry star decorations made from plastic bottles. With this simple tutorial from Esprit Cabane, you can turn the base of plastic water, juice or olive oil bottles into twinkling stars with just the snip of scissors. These pretty stars reflect light from every direction, making for perfect garland accents or hanging ornaments.

6. Nuts and bolts ornaments

Use spare bolts and washers to create a snowman, angel or Santa ornament for your holiday tree. Dreamed up by Inspired at Home blogger and FaveCrafts.com contributor Heidi Borchers, these adorable hardware-inspired ornaments are so easy to make, even the youngest kids can lend a helping hand. Check out Borchers’ step-by-step tutorial, and don’t forget to wash your hardware first!

7. Scrabble tile ornament

If you have a few pieces missing from your Scrabble board game, don’t toss the whole thing! Use the remaining tiles to craft a clever ornament for your Christmas tree, like WonderHowTo.com contributor Justin Meyers. Use your tiles to form festive words like “joy” and “peace,” or spell out the names of everyone in the family. As outlined in his tutorial, Meyers used a power drill to complete these ornaments. So, this one is best suited for older crafters.

8. Quilted CD ornament

After switching to a digital copy for music and movies, it can be tough to know what to do with those old CDs and DVDs. If you’re stumped for a reuse idea, try using them to create prim and pretty quilted ornaments like Tennessee crafter and Hellenismos blogger Helen. Don’t be too intimidated by the name. Helen’s “faux-quilting” technique is a little easier than the real thing. But this craft still may be a bit too involved for children and craft novices.
9. Illuminated photo memory ornament

Put your family photos on display for all to see with adorable memory ornaments made from plastic container lids. Submitted to BetterBudgeting.com by Kim Caple of Plymouth, Mass., this “aww-inspiring” craft is simple enough for beginners yet artistic enough for experts.

In her tutorial, Caple adorned a photo of her daughter at the beach with seashells for a decorative touch. But stretch your creative legs and add personalized embellishments for an ornament that’s truly your own. An added bonus – these ornaments are great for catching the light on your tree!

10. Recycled sweater wreath

If you’re stumped as to what to do with those heinous Christmas sweaters from Great Aunt Millie, you’re not the only one. But have no fear, Earth-lover! Help is on the way. Sweater Surgery blogger Stefanie Girard has dreamed up some pretty cool uses for the shrunken, hole-y and less-than-stylish sweaters in her closet. For the holidays, she used one of her old sweaters to create a one-of-a-kind wreath with a peppermint candy-style bow. Check out her step-by-step tutorial to whip up one of your own.

Posted on

Toddlers Can Help with Christmas Decorations Too!

father and son doing holiday crafts together

Get Your Whole Family Involved in Decorating this Holiday Season

By now you probably know I have a Grandson, Jasper! He’s 18 months old at the end of September 2012, so by Christmas time, he’ll be 21 months and a full-scale toddler. Right now he’s busy with his cars, his blocks, his fridge letters, and his books. I don’t think he can use scissors yet, but he “colors”. With a Grandfather that is an artist, and a Father who is an artist, and a Mother who loves the arts of all kinds, you can be sure there are plenty of hours each week devoted to artistic endeavors. The following internet article was written by Stephanie Brown and published in About.com. I enjoyed reading it and I hope you will too.

When it’s time for the family to get together and make Christmas ornaments and decorations or trim the tree, don’t forget about your toddler. These Christmas activities for toddlers can teach your child concepts about Christmas and help your child feel helpful and included in traditional holiday events.

1. Paint with Christmas Cookie Cutters

Like using stencils or sponge painting, a cookie cutter can help your toddler create something he recognizes when he doesn’t know how to draw the object. It’s also a good starting point for the toddler is reluctant to participate because he doesn’t want to get messy or doesn’t like the way tactile activities like finger painting feel. You can also use this activity to get ready for making ornaments with cookie cutters.

Tips:
•For a young toddler, put the paint and cutters inside a newspaper-lined pan. This will keep him from making too big a mess as he scoots the cutters around while loading them with paint.
•Older toddlers with a bit more practice can just use a paper plate. Both clean up easy.
•All ages should wear a smock or old T-shirt.

Homemade Paint Recipes
Painting is always a fun activity for toddlers. Early on, they learn about texture by using their hands, and later on they can master fine motor control when you introduce a brush. If you find you don’t always have paint on hand, here are a few recipes, many made with items you probably already have on hand.
Soap Paint

What you need:
Warm water
3 cups Ivory Snow detergent or soap flakes
Food coloring

What to do:
Add water, a little at a time, to detergent flakes.
Mix to consistency of heavy cream.
Color with small amount of food coloring.

Another Soap Paint

What you need:
1 cup soap flakes
1/3 cup liquid starch
1/4 cup water

What to do:
Whisk all ingredients together for 3 minutes.

Puffy Paint

What you need:
Flour
Salt
Water
Food coloring

What to do:
Mix equal amounts of flour, salt and water.
Add food coloring for color.
Pour mixture into squeeze bottles and paint.
Mixture will harden in a puffy shape.

Salt Paint

What you need:
1/8 cup liquid starch
1/8 cup water
Food coloring

What to do:
Mix together and apply to paper with a brush.
Keep stirring mixture. Paint will crystallize as it dries.

Powdered Milk Paint

What you need:
1/2 cup powdered milk
1/2 cup water
powdered tempera

What to do:
Mix all ingredients together.
Store sealed in the refrigerator.

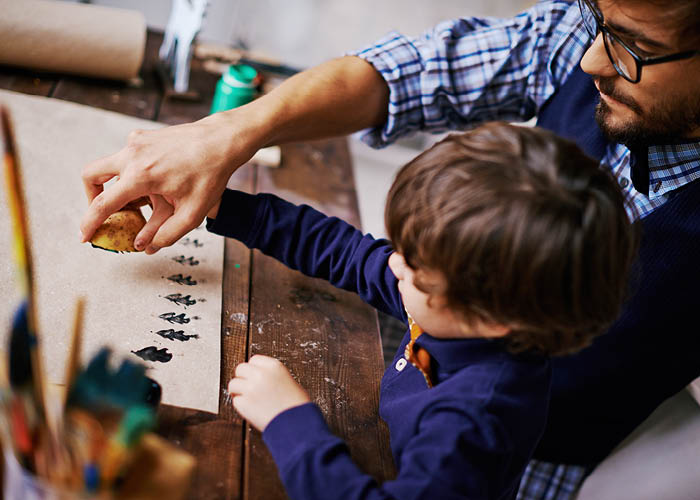
2. Paint Holly Leaves with a Potato

If you don’t have cookie cutters to go with every season (and who does?) then use what you have around the house. You can easily cut shapes into a potato leaving behind a surface that will hold paint and leave a uniquely patterned print behind. To make this activity toddler-friendly, you can stick a craft stick or a fork into the potato so it’s easy to handle. After you get the leaves printed, your toddler can dip his fingertip in red paint and add the berries. If you have large enough paper you can even make a wreath.

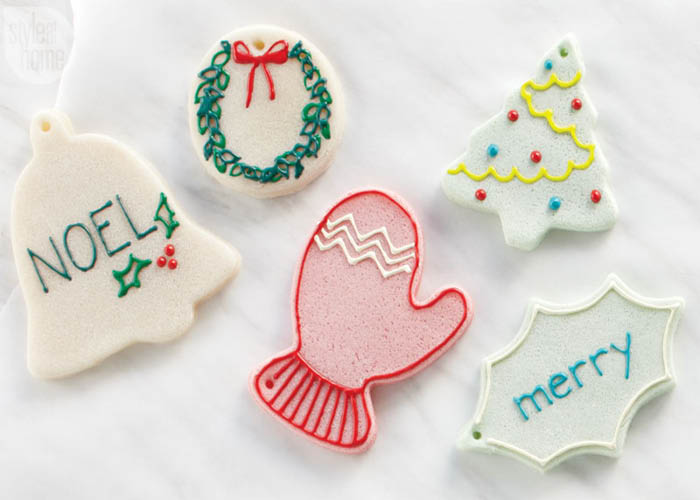
3. Make Cinnamon Applesauce Ornaments
Making these ornaments isn’t just fun, it’s a learning experience, too. Toddlers can practice following instructions and increase their motor skills as they help measure, pour, stir, roll and press out the ornaments with cookie cutters. Plus the smell of apples and cinnamon will stimulate your child’s sense of smell.
How to Make Cinnamon Applesauce Ornaments:

Cinnamon Applesauce Ornaments

You and your toddler will have a great time with this simple recipe for holiday ornaments. There is no cooking required, so it’s a safe activity as well. Friends and family will love to hang these on their trees this year, and the spicy smell is long-lasting. They also make a great addition to gift tags.

Difficulty: Easy

Time Required: indefinite

Here’s How:
1.The night before, drain the applesauce through cheesecloth and discard the fluid.
2.Cover your toddler (and yourself) with an apron or old shirt.
3.Prepare a surface to roll the dough onto. I like to use wax paper.
4.In a bowl, mix the applesauce and the cinnamon thoroughly and pat into a solidified ball.
5.Take about one cup of the mixture and place on the wax paper.
6.Place another piece of wax paper and place on top of the mixture and pat or roll until the ball is flattened and about 1/4″ to 1/2″ thick.
7.Cut the dough with cookie cutters. Use a straw to make a hole near the top so the ornament can hang.
8.Allow the ornament to dry. Depending on thickness, this may take 24-48 hours.
9.Thread a paperclip, ornament hook or curl ribbon through the hole.

Tips:
1.If you don’t have cheesecloth to drain the applesauce, you can use an old birdseye weave cloth diaper (flatfold) or other very thin fabric.
2.Be careful not to make the hole too close to the top or breakage may occur.
3.Ornament hooks can be purchased in bulk at your local hobby store.
4.Be sure to use sweetened applesauce. The sugar content helps hold the ornament together and prevent breakage.

What You Need
•One 16 ounce jar of sweetened applesauce
•8 ounces cinnamon
•Mixing Bowl
•Wax Paper
•Cheesecloth
•Curl ribbon, paperclips or ornament hooks
•Holiday cookie cutter(s)
•One drinking straw

4. Talk About Christmas in the Environment

Christmas is everywhere you look starting as far back as October, so take this opportunity to teach your child about the things you see. Since this time also marks the early winter in most areas, taking a walk around the neighborhood or to a park will likely yield plenty to talk about. Walk around churches to inspect the nativity scenes. Take a walk in the snow and build a snowman (top him off with a Santa hat.) Take a drive to look at all the Christmas lights. Pick a different thing to talk about during each shopping trip, focusing on the things that interest your child or that are a part of your own family’s celebration. This is also a great time to reinforce colors since there is such an abundance of green, red, silver and gold.

5. Play with Christmas Colored Playdough

Another reinforcing activity for Christmas colors can come by playing with red and green playdough. Make it with Kool-Aid or add a few drops of peppermint extract and stimulate your toddler’s sense of smell. Or make it without, add a drop or two of food coloring and let your child experience the mixing of color as he plays. Playdough is an activity that stimulates pure creativity and does so much to help your child master fine motor control.

Tip: Use the same Christmas cookie cutters you used for the painting activity to make festive holiday shapes out of the playdough.

Homemade Playdough Recipes by Stephanie Brown, about.com

These playdough recipes offer parents a way to help increase their toddler’s fine motor skills.

Homemade Playdough RecipeEasy Homemade Playdough Recipes Helpful Tips on making PlaydoughMomsFreeRecipes.Com

All of the playdough recipes below are for children aged 2 years or older and require adult supervision at all times.

Rubbery Playdough

2 cups baking soda
1 1/2 cups water
1 cup cornstarch

Mix with a fork until smooth. Boil over medium heat until thick. Spoon onto plate or wax paper.

Nature’s Playdough

1 cup flour
1/2 cup salt
1 cup water
2 tablespoons oil
2 tablespoons cream of tartar
beet, spinach, and carrot juice

Mix flour, salt and oil, and slowly add the water. Cook over medium heat, stirring until dough becomes stiff. Turn out onto wax paper and let cool. Knead the playdough with your hands until of proper consistency. Use as is, or divide into balls and add a few drops of the vegetable juices to make green, pink, and orange.

Playdough

4 cups flour
1/4 cup powdered tempera
1/4 cup salt
1 1/2 cups water
1 tablespoon oil

Mix together flour, powdered paint, and salt. Mix water and oil, and food coloring if desired. Gradually stir the water and oil mix into the flour mix. Knead the playdough as you add the liquid. Add more water if too stiff, more flour if sticky.

Alum Playdough

2 cups flour
1 cup salt
2 tablespoons alum
1 cup water
2 tablespoons oil
liquid food coloring

Pour dry ingredients into a large pan. Stir together to mix. Stir oil and food coloring into the water. Pour liquid into the dry ingredients while mixing, squeezing and kneading the playdough. If too sticky, add more flour. Keeps best in the fridge.

Just Like the Real Playdough (so they say)

1 cup flour
1 cup water
1 tablespoon oil
1 tablespoon powdered alum
1/2 cup salt
2 tablespoons vanilla
food coloring

Mix all dry ingredients. Add oil and water. Cook over medium heat, stirring constantly until reaching the consistency of mashed potatoes. Remove from heat and add vanilla and food coloring. Divide into balls and work in color by kneading the playdough.

Oatmeal Playdough

1 cup flour
2 cups oatmeal
1 cup water

Gradually add water to flour and oatmeal in a bowl. Knead until mixed (this playdough is sticky, but unique in texture.) Model as with clay.

Tip: Add cornmeal or coffee grounds in small quantity for texture.

Nutty Butter Playdough

1 cup peanut butter
1 cup powdered milk
1 cup honey
1 cup oatmeal

Mix together and play. Make sure this playdough is not used by infants under 12 months of age, who should not consume honey.

Kool-Aid Playdough

2 1/2 to 3 cups flour
2 cups boiling water with 1 package Kool-aid (any flavor)
3 tablespoons corn oil
1/2 cup salt
1 tablespoon alum

Mix ingredients and knead with flour (may take up to 1 extra cup). Use more if the dough draws moisture in high humidity. Keeps well, has a nice fragrance and is very colorful and very flexible. This recipe is super soft and makes great playdough hair.

6. Make Gingerbread Cookies and Houses

Making gingerbread cookies is one of my favorite holiday activities. We love to make the men and flat pieces for gingerbread houses, too. Like making cinnamon applesauce ornaments, this is an activity where toddlers can participate in stirring, mixing, measuring and using cookie cutters. If you’re not into baking or are short on time, try picking up a gingerbread house kit like this one from Wilton where all you have to do is start decorating (just watch out for items your toddler can choke on like gum drops.)

For years, I’ve been using this recipe to make gingerbread men because it’s low in fat and the cookies come out very soft. For houses, you’ll want one that crisps up like the gingerbread recipes here (house instructions included).

Try this Gingerbread Cookie Recipe that Makes Soft Gingerbread Men: Recipe by Fiona Hayes has 4.5 stars out of five stars in reviews!

Cut the fat, not the flavor. These gingerbread men use half the butter normally used in most gingerbread cookie recipes. Applesauce helps the cookies retain their moisture and gives them a soft texture.

Cook Time: 10 minutes

Total Time: 10 minutes

Ingredients:
•1/4 cup butter, softened
•3/4 cup firmly packed brown sugar
•1/2 cup unsweetened applesauce
•1 egg
•1/3 cup dark molasses
•3 cups all-purpose flour
•1 tsp baking soda
•2 tsp ground ginger
•1 tsp ground cinnamon
•1/2 tsp allspice
•1/4 tsp ground cloves

Preparation:

In a large mixing bowl, beat butter, sugar, and applesauce until smooth. Add egg and molasses and mix well. In another large bowl, combine flour, baking soda and spices. Add to sugar and molasses mixture, stirring well. Divide dough in two; cover with plastic wrap and chill for 2 hours.
Preheat oven to 350 degrees. Roll out dough to 1/4 or 1/8-inch thickness. Cut gingerbread men with a cookie cutter. Add candies or raisins to decorate. Place 1-2 inches apart on a parchment-lined baking sheet. Bake 10-12 minutes. Add frosting or more decorations when cool. Makes 30 cookies.

Per serving: Calories 94, Calories from Fat 16, Fat 1.8g (sat 1g), Cholesterol 11mg, Sodium 48mg, Carbohydrate 18g, Fiber 0.4g, Protein 1.5g

7. Make Gingerbread Man Ornaments

Don’t put your gingerbread cookie cutter away just yet. Use it to trace and cut out a gingerbread man on cardboard that your child can decorate while you eat cookies fresh from the oven.

Some tips:

•Use a small dish of glue and a paint brush to brush the entire surface of the cardboard for decorating. This is good for young toddlers who can’t yet control the amount of glue they squeeze out of a bottle.
•Decorative items you use could be fabric scraps, little pom poms, buttons, red rickrack, googly eyes, puffy paint or just plain crayons, colored pencils and markers.
•If you use small items like buttons or googly eyes, make sure your toddler has constant supervision to prevent choking and hang it high on the tree when it’s finished.

8. Finger Paint with Christmas Colors

Using finger paints exposes your toddler to a unique sensory world involving sight, slippery touch and squishy sound as well. Add mint or vanilla extract and excite his sense of smell, too. Finger painting helps your toddler gain fine motor control: Each time his hand moves the way his brain directs or expects, he is closer to fully control a paint brush, crayon or pencil. Don’t be afraid to let your toddler mix different colors of paint together. This is part of the learning experience. Finger painting is mostly about the process of art rather than producing a finished product.

Tip: Line the table with newspaper or do this activity in a high chair for easy clean-up.

Finger Paint Recipes again by Stephanie Brown of about.com:

Homemade finger paint is a great way to introduce art and improve your toddler’s fine motor skills.
Photo © Stephanie Brown

Ads

Trader Joe’s CouponsGet Trader Joe’s Coupons Trader Joe’s Discounts online!www.ShopAtHome.com

Free Worksheets for KidsSelection of Printable Worksheets Easily Sorted by Grade and Subject!www.Education.com/Worksheets/

Paralegal Training – 2012Find Paralegal Training Programs Near You – Apply to a School Now!CampusCorner.com/Paralegal

Toddlers and Twos Ads •Activities for Toddlers
•Recipes for Kids
•Video of Recipes
•Food Recipes
•Soap Recipes

Finger painting is just one of the ways your toddler begins to gain fine motor control. Finger painting may seem like a mess now, but it is paving the way for more refined skills like holding a pencil, using buttons and zippers or tying shoes. If you find you don’t always have finger paint on hand, here are a few recipes made with items you probably already have in your pantry.
Finger Paint (Uncooked Version)

What you need:
1/2 cup liquid starch
1/2 cup soap powder
5/8 cup water

What to do:
Beat together until the consistency of whipped potatoes.

Finger Paint (Cooked Version)

What you need:
2 cups flour
4 cups cold water
Food coloring or dry tempera

What to do:
Mix flour and water and cook over low heat until thick.
Cool.
Add a pinch of salt.
Add dry tempera or food coloring, if desired.
Store in covered jar in refrigerator.

Kool-Aid Finger Paint

What you need:
2 cups flour
2 packs unsweetened Kool-Aid
1/2 cup salt
3 cups boiling water
3 tablespoons oil

What to do:
Mix wet ingredients into dry ingredients.

Jell-O Finger Paint

What you need:
Any kind of flavored Jell-O
Hot water

What to do:
Mix enough hot water (a little at a time) until the mix has the consistency of finger paint. Allow cooling before play.

Pudding Finger Paint

What you need:
Instant vanilla pudding
Food coloring

What to do:
Mix pudding according to directions.
Add food coloring for the desired color.

9. Make Contact Paper Ornaments

Contact paper is a clean and simple way for toddlers to make collages and these ornaments look great on the tree or as window decorations. Just lay a sheet of contact paper sticky side up on a table and provide your toddler with collage materials. I like to use paper scraps, confetti (make this at home with a hole puncher) or scraps of metallic ribbon. For a stained glass effect (if you’ll be hanging these in a window) use small scraps of tissue paper. When your toddler is done placing the pieces, cover the entire thing with another piece of contact paper, sticky side down. Then cut into shapes, punch a hole in each shape and use fabric or curl ribbon to hang where you’d like.

10. Hang Candy Canes
When it comes time to trim the tree, you probably don’t want your toddler involved in hanging lights or handling glass ornaments. Candy canes, however, are definitely something your toddler can keep busy with while being supervised by other decorators.

11. Make Garland out of Cereal Os

Stringing popcorn and cranberries is a job for older siblings and adults. Both are items your toddler can choke on if not watched the entire time and they require quite a lot of dexterity, not to mention a sharp needle! You can get your toddler busy alongside you by letting him string cereal. Use a sturdy, circular cereal like Fruit Loops or Cheerios. For younger toddlers, the stiffer the string is the better. Older toddlers can do this with yarn and a reinforced end. Do this by wrapping the end of the string with a bit of tape (enough to grasp between finger and thumb and push completely through the hole to be pinched and pulled through the other side) or wrap the end of the string around a pipe cleaner for easier threading.

12. Make Paper Chain Garland

Making paper chains is too complicated for toddlers to manage alone, but it’s definitely something that can be done with supervision. Also, remember that including your toddler in the steps of your own or an older child’s project can yield good results and a feeling of success and cooperation for all.

When making paper chains, your toddler can:
•Color the paper before it is cut
•Use rubber stamps to decorate the paper before it’s cut
•Help with cutting if he is an older toddler
•Hold the paper while you carefully staple it if you’re stapling the links together
•Apply glue with a brush or glue stick if you’re gluing the links together
•Help with counting the pieces of paper you need
•Sort different colors of paper (red and green, for example)

How to Make a Paper Chain Garland by Kate Pullen, about.com:

Rubber Stamped Paper Chain

Hand stamped paper chains can be made for any number of occasions. Birthdays, seasonal festivities, barbecues, weddings and all forms of parties can be decorated with some wonderful hand stamped paper chains that are totally unique. The paper and color schemes can be chosen specifically to match the occasion and stamped with images that complement other stamped objects such as cards and decorations.

Paper chains are made from strips of paper that are joined to form links. The paper can be stamped either before or after they have been cut.

This is a good project for beginners as the odd wobbly image will not show.

Difficulty: Easy

Time Required: Quick – depending on the length of chain

Here’s How:
1. Decide whether to stamp the paper first and then cut the strips or cut the strips before stamping. There are advantages to each technique

Stamping Before Cutting •Easier to stamp as the paper is bigger and less fiddly
•Any stamp can be used as it does not matter if the stamp is larger than the paper strip
•A random pattern can be achieved
•It is less obvious if a stamp is misplaced
Cutting Before Stamping •Perfect for the formal placement of stamps
•Strips can be stamped for a specific position within the chain, for instance, links that feature a certain design
Beginners may find it easier to stamp the paper first.
2.Stamp the paper before or after cutting as required. The stamps can be positioned in any way, however, remember that the finished images will be viewed either way up, therefore, a random stamping pattern might be best.
3.Cut the paper into strips. The strips of paper can be any size. Smaller strips will give a more delicate chain whereas larger strips will give a more bulky chain. The choice of size will largely be down to personal preference however a good size for a rubber stamped paper chain is 8-by-2 inches. A fairly large chain is required to show off your lovely stamping!
4.Form one strip of paper into a loop to form a link and fasten it using glue or another method as required. Take the next strip and place this through the first link, forming this into a loop and fasten. Repeat in this manner until the chain is the required length.

Tips:
1.If you are stamping before cutting, fasten the paper to the work surface to stop it curling.
2.A proportion of 4:1 is a useful ‘rule of thumb’ when planning the size of strips (for example a strip should be 4 times longer than wide).
3. Use a fast drying ink so that you can cut the strips immediately.
4. Try other fastening techniques such as using brads or stickers.
5.Mark out the strips in pencil on the rear of the paper before cutting or cut a card template to use to cut around.

What You Need
•Rubber stamps – the design and size will depend on the occasion
•Inks
•Paper – craft or postal paper is ideal
•Glue or other methods of joining the links
•Scissors
•Ruler

Posted on

Make an Advent Calendar with your Children

advent calendar to make with your child

I love Advent calendars but never had one for our children. Always too busy at Christmas time with our dough ornament business Calliope Designs.
Here’s another great post by Stephanie Brown of About.com about how to make your own advent calendar. Showing your toddler that not all things come from stores, that some of the best are made at home, is a great lesson in self-reliance!

Make an Advent Calendar with Your Children

There are several ways your toddler can participate in this activity: by making it, using it or both. Personally, I like the calendar to be something that I make first and the children use to count down to Christmas, but depending on the type of calendar you make, your toddler can lend a hand as well. This activity is a great way to start a family tradition, instill the values of your religious community and illustrate the passage of time.

Here are some ideas to get you started:

Easy Advent Calendars for Kids

Barbara Crews of about.com writes about the history of advent calendars:
Some form of the Advent Calendar has been used for more than 150 years and becomes increasingly popular every year. From traditional calendar to calendars that feature popular collectibles and themes, there is a calendar for everyone.
The origin of the calendar, like so many of our Christmas traditions, started in Germany in the 19th century. Different methods of counting down the days to the celebration of Christmas were used.

Drawing a chalk line to mark off the days, later lighting a candle every night or putting up small religious pictures marked each day until Christmas. The first printed calendar was produced by Gerhard Lang in Germany. When he was a child, his mother attached little candies to a piece of cardboard and each day Gerhard would take one off. His first (printed) calendar consisted of miniature colored pictures that would be attached to a piece of cardboard each day in December. Later Advent calendars were made with little doors to open on each day. The child might find a small piece of candy, a Christmas picture, a religious picture or a bible verse.

The German calendars were sold until World War II, at which time production was stopped due to the war shortages. After the war, the production of calendars resumed in 1946 by Richard Selmer. Selmer credits President Eisenhower with helping the tradition grow in the United States during his term of office. A newspaper article at the time showed the Eisenhower grandchildren with The Little Town Advent calendar. His company still produces calendars today and can be ordered online. Check out the online museum to see some of their early designs.

The first Advent calendars were based on 24 days with Christmas Eve as the last night to either put up a picture or take a candy. Today, the traditional German calendars still show 24 days, but in the United States, it’s not uncommon to also find ones with 25 days — the last opening to occur on Christmas Day.

Advent Calendars can be found everywhere Christmas is celebrated and have been made with many different themes. There are permanent ones with little drawers that are opened every day, felt pieces to decorate a tree, religious icons behind the different doors and lots of pop-culture/character Advent calendars. The traditional ones are still a paper/cardboard piece with a small treasure behind the doors. The treasures can range from a beautiful miniature religious picture, perhaps a little wooden toy or even a piece of candy (sure to cause problems when there is more than one child in the household).

In our family, we have a tradition that dates back to 1969, when I found a wooden tree Advent Calendar. There are painted wooden ornaments and each day another ornament is chosen to be added to the tree. On Christmas day, the star tree topper is finally added. The tree has grown a little shabby and the ornaments are getting tattered, but it’s still a tradition looked forward to every December.

It’s not too late to start a tradition like this for your family, one that will become a real treasure in the years to come.

Jennifer Wolf of Single Parents Guide suggests some Easy Advent Calendars for Kids:

Advent calendars are a fun way to help your kids count down the days until Christmas or any other holiday or special event. Traditionally, Advent begins on the fourth Sunday before Christmas, so in 2011, Advent begins on Sunday, November 27; but you can also start your countdown on December 1 or any time before the holiday begins. All of the simple Advent calendars shown here can be made from scratch using items you already have sitting around the house.

Hershey Kisses Advent Calendar

Help your kids count down the days until Christmas with this yummy homemade Advent calendar. Simply fold Hershey kisses (or any other festive chocolates) into plastic Saran wrap. Then tie each treat off with a piece of ribbon. You can even put notes inside each section so that the Advent calendar includes 25 reasons why you love your kids or 25 reasons why you’re proud of them. In this way, the calendar serves two purposes – counting down to Christmas Day, and reinforcing to your kids how much you love and care about them!

Good Deed Advent Jar

Fill a simple Mason Jar with good deeds you can do together between now and Christmas. Make sure to tailor the jobs to your kids’ ages, and make a different jar for each child. Alternatively, fill a jar with good deeds you can to together for the community.

Paper Chain Advent Calendar

This is another easy Advent calendar for children. Simply make a paper chain out of 25 strips of red or green construction paper. (Or consider using strips of old wrapping paper!)

Inside each link, you could even write a verse that tells part of the Christmas story. Or, to encourage your children to think beyond themselves, consider writing an idea inside each link for a mini-service project. For example, one day’s project might be making a Christmas card for someone in a nursing home. Another day’s project might be clearing off the snow from your neighbor’s car.

Be creative and see what ideas you come up with for supplementing this simple children’s Advent calendar

Santa’s Beard Advent Calendar

When I was a kid, we used to make these using paper plates to support Santa’s beard. But now you can simply print out a picture of Santa and have your kids glue one cotton ball onto the image for each day in December. When Santa’s beard is full, Christmas will be upon us!

•Advent Calendar – Countdown to Christmas
Sherri Osborne of Family Crafts Guide has some Easy Crafts Advent Calendars for Kids:
These instructions will teach you how to make an advent calendar or two. Choose from a large selection of patterns! You can make fabric advent calendars, paper advent calendars, and so many others using these free craft projects.
Waiting for Christmas Day to arrive can be tough. The anticipation of Santa’s visit, family gatherings, and special gifts can make each day seem like an eternity, especially for kids.

Something we have always used to help make the wait for Christmas a bit easier to handle is an advent calendar. The word advent originated from a Latin word meaning ‘arrival’. With an advent calendar, you countdown each day until Christmas in a special way. You usually start the countdown on December 1st, but you can design your advent calendar to start on any day you like.

Here are some advent calendars you can make to help you with the countdown to that special day.

• Advent Candy Tree and Poem
Follow these instructions and you can make a special advent craft along with a poem that goes along with it.

• Advent Collage Craft
Made with printable templates and magazine pictures, this advent craft is simple enough for the youngest crafter.

• Advent Handprint Wreath
This fun advent wreath is made with paper handprints.

• Good Deed Advent Jar
Decorate a plain jar and fill it with good deads. Pull out one good dead (or more) to do every day before Christmas.

• Advent Christmas Tree
Print out a Christmas tree template and Christmas tree ornaments and use them to count down the days until Christmas.

• Days until Christmas Activity Calendar
This calendar will not only help you count down the days until Christmas but also gives you fun activity options for every day.

• Felt Advent Christmas Tree
These instructions include a printable pattern for a Christmas tree.

• Advent Santa Beard
Create an advent calendar that looks like Santa and his beard is made of advent rings.

• Advent TP Christmas Tree
Recycle toilet tissue rolls into a fun Christmas tree decoration that doubles as an advent calendar.

I hope you enjoy all of these advent calendar crafts and activities. If you make any of these crafts, make sure you send in a photo. You can also get your crafts published. If you want to be one of the first to know when new craft projects are posted, take a few moments to sign up for the Family Crafts Newsletter and you can also chat about Christmas with others in the Family Crafts Forum.

Posted on

Fun DIY Christmas Ornaments from the Internet

fun DIY ornaments from the internet

Soon, it’s going to be Christmas Eve, and everyone must have already started hunting for those easy Christmas ornaments, isn’t it? The ornaments discussed in this article are not only easy to make, but are made quickly as well. Christmas ornaments do play a very important part in our Christmas decorations, don’t they? This is the very reason we are here, telling you how to make the best ornaments, the easy way. While we have some simple traditional Christmas ornaments like candies and Christmas stockings, let us also look at some contemporary yet easy Christmas ornament ideas.

Easy to Make Christmas Ornaments found on the Internet!

Easy Christmas Ornament # 1

Make a list of various things you can use as Christmas ornaments. Miniature Christmas wreaths, the face of Santa Claus, mistletoe, holly, Christmas candles etc. are a few. Draw these on a colored paper and cut them out. Cover them with some colored gelatin paper to make them look attractive. Now, hang these pieces to the Christmas tree using threads or ribbons. So, you now have your first set of easy to make Christmas ornaments ready. Aren’t they really easy to make? We will now see how to make some Santa Claus crafts.

Materials Required

White construction paper 10” x 10”
Red, white and green paint
Black permanent marker
Red gelatin paper
Blue satin ribbon
Sparkle pen or powdered sparkle
Scissors
Punching machine

Procedure

Draw a Santa Claus on the white construction paper in such a way that most of the paper is used up. Now, cut this drawn Santa Claus and color it with the paints you have. Use the black permanent marker to draw necessary outlines after, or before painting. Apart from black, you can use any marker that will help the outlines stand out. Now, you need to cover the red part of the Santa Claus with gelatin paper. Cut gelatin paper of necessary size. Using sparkle pens, draw outlines on the entire cutout. Punch a hole on the topmost part of the cutting. Pass a satin ribbon through this hole, and hang the craft to your Christmas tree.

Easy Christmas Ornament # 2

Candies and small chocolates wrapped in colored paper, have always looked good as Christmas ornaments, haven’t they? Candy sticks are in fact, one of the most traditional Christmas ornaments. Then, small-sized colored socks can also be used as homemade ornaments. All you need to do is look for stuff that will look good on your Christmas tree, and then enhance it with sparkle and glitter. These are perhaps the easiest Christmas ornaments to make. We will now see how to make Christmas Baubles.

Materials Required

Chocolate wrappers of all sizes and colors
Newspaper
Adhesive Tape
Red and white satin ribbons

Procedure
Roll the newspaper into balls of equal size. Apply adhesive tape from all sides to even out the surface. On this adhesive tape part, start sticking the chocolate wrappers that you have, using some gum. Make sure that the inside of the bauble (the newspaper) isn’t visible. Now using a ribbon, form a hook anywhere on the ball. You can do this by sticking two ends of a 1cm ribbon and passing the other ribbon through it. Your baubles are now ready to be hanged.

Some More Easy Christmas Ornaments

Find It!
If you have absolutely no time to make, draw, cut and hang the easy Christmas ornaments we discussed, we have some other handmade Christmas ornaments for you. Kids can make some really nice ornaments using these ideas. Look for newspapers and magazines at home. There must be pictures of Christmas ornaments in them, right? Just cut them and hang them to your Christmas tree. Everything that you think relates to, and complements the Christmas theme can be used. This is by far the easiest Christmas ornaments idea you can find, isn’t it?

Wrap It!
Look for objects of different sizes and shapes, that are light in weight. Cover or wrap these with some inexpensive beautiful paper and you have a number of homemade Christmas tree ornaments ready in no time. Remember that though there are many Christmas ornaments to make, the easiest ones are those which are made quickly. This is the best easy Christmas ornaments idea that you can ever get your hands on. This idea is a life savior when you run out of the ornaments you bought!

Hang It!
If you want to experiment with decorating your Christmas tree, then apart from the traditional ornaments, you can come up with your own ideas too! If you have something that might just look good on the tree, hang it! A few examples of such cheap Christmas ornaments are; leftover ribbons, some leftover colored paper, a few miniature lanterns, etc. If you have a lot of gift paper remaining, just cut in the shape of Christmas ornaments and hang it on your tree.

Now that you know how to make these ornaments, what are you waiting for? Get creative and decorate your Christmas tree with these easy homemade Christmas ornaments. Don’t use too many ornaments of the same type, or color. The more different they are, the better your tree will look! Have fun with these simple ornaments and have a Merry Christmas!

Article by Santa Mann, posted on the Internet

Posted on

Making Christmas Preparation Fun for the Kids

two little kids prep for Christmas decorations

I really like this article by Kerr Griffen posted on the internet.

Making Christmas Prep More Fun

One way to be sure that your Christmas season is both festive and fun for the entire family is to have the perfect craft ideas for kids in mind when they are let out of school for the winter. Homemade Christmas ornaments are a brilliant way for your kids to make gifts that they’ll genuinely enjoy giving to friends and family, and all while making use of their creative imagination. Many years from now, these kids Christmas ornaments will bring forth happy remembrances of their years as a child, joining days gone by to the present, possibly even bringing generations of your family together. You can’t ask for a great deal more from a gift than that.

Depending on what their use is, personalized Christmas ornaments may take numerous forms. Consider having your kids’ Christmas ornaments utilized as Christmas tree toppers should you have something somewhat elaborate in mind. Because a one of a kind Christmas ornament will stand out, you may want to have the kids decorate their very own Christmas balls each year. Glass ornaments can be used to mark special occasions such as wedding anniversaries, accomplishments, baby’s first Christmas, and more.

There are a host of options available out there with regards to the kids Christmas ornaments for which you opt to make and/or personalize. A homemade Christmas wreath or an elaborate centerpiece needs lots of imagination and energy, however, these will offer you a personalized touch that goes beyond simple Christmas tree ornaments. Having said that, there are numerous Christmas tree ornaments offered which could be quite easily customized. As an example, there are ornaments such as these that include Santa in his sleigh driving his line of reindeer. This is made up of eight or nine individual ornaments, each of which has a blank space adequate enough for your child’s name and the date.
AdChoices

Other options for quickly individualized Christmas ornaments make use of photographs. These enable you to have fun and play photographer as you take fun holiday pictures of your young ones and family members, and then you can let them choose which photographs they’d like to see immortalized on plaques, ball ornaments, or perhaps the inside of a snow globe.

If you’re feeling a bit more adventurous and would like to make your kids Christmas ornaments from scratch, salt dough is a classic and creative possibility. After finding the best recipe and instructions from the library, a friend, or an Internet search, you can actually leave the remaining portion of the process completely up to the kids. The ornament style, paint, decorative touches, and everything else are only restricted to the child’s own creativity. Older children might like to try their hand at ceramics, crochet, or embroidery in an attempt to keep them engaged with the crafting project. Should you have a less artistically-inclined child, craft stores and specialty shops regularly make available a wide array of ornament kits that are easily personalized and only call for a little bit of assembly.

Regardless of which course you go, personalized and homemade Christmas ornaments offer activities that simultaneously occupy the mind of your child and create cherished memories of the holidays that will last for many generations and Christmas seasons ahead.

Be sure to read one of our blog posts on How to Make Dough Ornaments at Home, under Make Your Own Ornaments and Other gifts!

Posted on

Crafty Idea: A Doggy Wreath!

westie in stocking personalized pet christmas ornament

Another great idea found on the world wide web!  No polyurethane required on this gift! It’s edible.  So your special pooch will be oh so happy!

A Great Craft Idea for Your Pets!

Again, please include the little ones in your home in this project!  They will love spending the time with you making something their very favorite dog in the whole wide world will get on Christmas morning.  Of course, you might have some explaining to do as to why Santa doesn’t deliver gifts to pets as well as children, but be creative!  I’m sure you’ll think of something!

After you’re finished, we invite you to take a look at our darling pet ornaments and family trees with pets.  Those are in the DIY section, or the title Design Your Own!  It’s pretty fun and something that will last forever.

Whether given to your own pet or a friend’s Fido, this wreath with edible ornaments is the perfect pooch present.

Materials

  • 12-inch cardboard circle, or a 12-inch Styrofoam wreath (available at craft supply stores)
  • Scissors
  • 5 yards of ribbon and matching bow
  • Large dog bones
  • Dog toys
  • Tape
  • Evergreens, optional

Instructions

  1. If using the cardboard round, trace an 8-inch circle in the middle of it (a small mixing bowl or plate will be approximately the right size). With the scissors, cut out the inner circle, leaving a ring or wreath shape.
  2. Tape the ribbon onto the back of the cardboard wreath or tie it to the Styrofoam wreath and start winding it around the circle on a slight diagonal. Once you have come full circle, cut the ribbon and tape it down.
  3. Next, cut ten or so 9-inch lengths of ribbon for attaching the dog bones and toys. Attach eat treat separately by first placing the dog bone or toy on the wreath and securing it by placing a length of ribbon across it. Flip the wreath over and tie the ribbon securely in a knot, making sure there is no slack in the loop around the bone or toy. (This tying method allows the items to be removed one at a time without displacing the others.) Continue tying on the bones and toys in this fashion, leaving a 3-inch space for the bow between the first and the last treat.

For a fuller look, tape greens onto the cardboard round or push the ends into the Styrofoam wreath. With the remaining length of ribbon, tie a loop on the back of the wreath at the top so that it can be easily hung for all to see — especially the puppy dog

This crafty gift idea was found on Disney Family fun website!  Be sure and check it out for some great gift ideas.

Posted on

Crafty Idea: Cute Photo Frame Gift for your Pup!

Dog House Photo Frame personalized christmas ornaments

We believe in do it yourself projects to make Christmas gifts, and I’m always on the lookout for cute Pet gifts!  I know there are dozens of stores, big and small, brick and mortar and online, that sell thousands of dog gifts!  But here’s a way you can make something really cute for very little money!

Photo Frame for Your Puppy Ornament

If you have children, don’t forget to include them in the crafting of this gift!  They’ll love being involved and will be proud of their accomplishment!  What a great way to encourage the love of giving in a child – which of course starts at home!

Your family dog will look pretty as a picture when her snapshot is displayed in this dog-bone frame.

Materials

  • Flat wooden frame
  • Dog-bone treats
  • Water-based high-gloss polyurethane
  • Small paint brush
  • Hot glue

Instructions

  1. Remove the glass and the cardboard backing from a flat wooden frame and set them aside. Lay the wood, face side up, on a flat working surface and arrange crunchy dog-bone treats on top of it. Place them horizontally, end to end to fashion a border all the way around, or diagonally to accent the corners.
  2. Once the pattern is determined, remove the dog bones, lay them face down, and apply a coat of water-based high-gloss polyurethane to the backs. this is important to protect the dog bones from invasions by bugs, and from deterioration due to moisture or humidity in the atmosphere.
  3.  Once dry, hot-glue the bones to the frame so that the polyurethaned sides are against the frame (adults only).
  4. Apply polyurethane to the tops and sides of the glued-on dog bones, let dry, and apply another coat of polyurethane.
  5. When the final coat is completely dry, insert the puppy’s photo and reassemble the frame.
  6. Some wrapping hints….. with all pet products it’s probably a good idea to put them somewhere up high, out of reach of the curious and always hungry dog!  We don’t want to spoil the Christmas morning surprise with a ripped open package… and polyurethane doesn’t taste all that great either… even to a dog that will eat everything!

Don’t forget to check out all of our custom-made pet ornaments at www.calliopedesigns.com.  We have dog bones to be personalized with the name of your dog and the year.  We have family trees with adorable dogs to be added to the family, and dog house ornaments with different represented breeds of dogs!

This great handcrafted gift idea was found on the Disney Fun Family website.  Be sure and check it out for many cool gift ideas!

Posted on

Gifts for Your Favorite Pooch!

Family and Dog: Couple with Pet personalized christmas Ornaments

Yes, we know our Dogs are an important part of the family, really, family members!  And what’s more, fun than cooking up a batch of Christmas treats for your special Fido to put in his Christmas stocking on the mantle on Christmas Eve!  But be careful…. if you don’t hang it high enough Fido might just do some pre-Christmas morning snooping!

Great Gift Ideas for Your Pets

Here’s a recipe I found on the internet for Doggy Bark! If you have children, be sure and get them involved in creating these treats – it’s a great way to start learning the love of giving, as well as learning how to cook!

Be sure to use carob chips — chocolate is harmful to canines.

Ingredients

    • 4 cups carob chips
    • 1/2 cup creamy peanut butter
    • 1/2 cup dry-roasted peanuts or chopped walnuts
    • 1/4 teaspoon cinnamon

Instructions

  1. In a bowl, melt the carob chips in the microwave for 30 seconds. Stir them with a wooden spoon, then microwave for 30 seconds more.
  2. Stir in the peanut butter and microwave for another 15 seconds. Stir the ingredients again to combine.
  3. Add the nuts and the cinnamon, then stir the mixture to coat the nuts.
  4. Line an edged cookie sheet with aluminum foil and lightly spray the foil with nonstick cooking spray. Pour the mixture onto the foil and chill it for 15 minutes in the freezer or 30 minutes in the refrigerator.
  5. Remove the bark and break it into roughly 1- by 2-inch pieces. Store it in an airtight container for up to 2 weeks. Makes about 70 pieces.

Sounds good enough to eat!  There’s nothing in this recipe that isn’t good for humans alike, so try if you are so inclined.

Be sure to check out our special Dog Bone Personalized ornaments at www.calliopedesigns.com – we have tan ones and white ones, and all can be personalized with your favorite dogs name and the year!

This great handcrafted gift idea was found on the Disney Fun Family website.  Be sure and check it out for many cool gift ideas!

Posted on

How to Fight the Winter Blues with Ornaments

crafts with your kids

This article by Luzerna Solon encourages us to use our hands and creativity to fill our homes with holiday decorations.  We hope she has seen our articles on making your own bread dough Christmas ornaments at home.   Be sure and look up our recipes, tools, and techniques on our blog under Make Your Own Ornaments!  It’s quite fun!

Holiday Crafts to beat Winter Storms and Gloom

A lot of people decorate their homes inside and outside during the major fall and winter time Holidays, such as Halloween, Thanksgiving, and Christmas. A lot of these people head to the stores every year and look for new and exciting ornaments and decorations to purchase. During the month of October, people buy rubber skeletons, thick paper cutouts of witches, black cats, pumpkins and skeletons, large inflatable yard displays of animated monsters, and pumpkins are carved into jack-o-lanterns and placed outside doors. During November, there are inflatable turkeys in yards, and smaller ones sitting on Kitchen tables, along with cornucopia displays, and windows are decorated with thick paper cutouts of pilgrims and turkeys.

December is the same way, with houses and yards filled with inflatable Santa’s, Animated Snow Globes, and life-sized reindeer and sleighs, Windows and stands are covered with garland and other decorations, door have wreaths hanging on them, and most homes have a large decorated Christmas tree, that is lighted and placed in a window for those outside to see as they pass by.

Most of these decorations have been bought in stores, and people spend a huge amount of money on them when they don’t have too at all, in fact, there are some homes that are decorated and look just as nice or better, that have been decorated with decorations that are homemade. Just about any store bought decoration, except the large inflatable lawn decorations, can be made at home, or at least you can may your own variations of them, and save yourself a lot of money.

Here are just a few ideas for you to make your own Holiday decorations; Instead of buying the thick paper cutout images of skeletons, bats, pumpkins, jack-o-lanterns, turkeys, pilgrims, Santas, and others, just search the internet for clipart or holiday decorations, and you can find hundreds or thousands of these images. Just select the images you like, and print them out using plain copy paper, then you can cut them out with scissors and hang them all around your house, including the windows.

The garland comes in different colors and thicknesses, and it seems every year there are more types of it to choose from, and like everything else, each year the price increases. Did you know that most homes have three things that can be turned into some beautiful homemade garland, to decorate the Christmas tree with? The three things you need to make your own garland is; the thread of any color, a small needle and a bag of microwave popcorn. Here’s how we used to make homemade garland every year when I was a youngster. Simply pop the popcorn, but don’t add any butter or seasonings to it, in fact, it works best when you use plain popcorn, that is butter free, but any popcorn will work.

Simply, thread the needle like you do if you were sewing, and carefully pass the needle through the popped corn, then add more and more, until after a while you end up with a very long string of popcorn, that you can hang onto your Christmas tree. What is great about this is when the season is over, carefully remove the stringed popcorn from your tree, and take it outside and hang it over a fence or a tree branch, for the birds to enjoy.

Christmas ornaments can be made too, they actually sell clear glass ornaments that you can decorate, or you can buy plain, Styrofoam balls of different sizes, and make your own ornaments, you can paint, glue and sprinkle these with glitter, add ribbons, sequins and other items, fasten ornament hooks on them, and hang them onto your Christmas tree, or where ever you wish.

There is no limit to the types of Holiday items you can make at home, throughout the whole Holiday Season, from October through January, in fact, you can make them all winter, even to use the next year. Making homemade ornaments and decorations is such great fun, one person can do it, or a whole family can make them together, anyway, it’s a great way to help fight the winter blues.

There is a website that describes numerous activities and other methods to help eliminate the Winter Blues, this website is called: Winter Activities – and it may be found at this url: https://www.winter-activities.com 

Author: 

Posted on

Find More Salt Dough Projects at MortonSalt.com

salt ornaments craft

Fun & Games

Paintbrushes
Paint on Salt

Try SaltCraft, the art of painting on salt paper. Peel off the backing from a piece of clear contact paper. With sticky side up, cover thoroughly with Morton® Salt. Gently shake off excess salt. Let stand at least 48 hours.
With salty side up, place salt paper over a coloring book picture or a piece of plain paper. Use a paintbrush and watercolors to paint on the surface of the salt paper. Use light strokes when painting, rather than rubbing hard. Let dry, then remove the paper from under your design.
To give design a softer look, spray with a fine mist of water. Glue design to background paper of your choice, with either textured or smooth side up.

Child playing with dough
Sculpt with Klaymates

Kids and parents alike have fun making Morton Klaymates—rainy day salt sculpture friends. In a medium saucepan, mix 1 cup flour, 1/2 cup Morton® Salt, 2 teaspoons cream of tartar, 1 cup water, and a few drops of food coloring (optional). Cook over medium heat, stirring constantly until mixture is very thick and lumpy as it cooks. Cool slightly and then knead in 1 or 2 drops of vegetable oil. Store in a plastic bag. For more brilliant shades, use paste food colors (available where cake decorating supplies are sold).
NOTE: SALT SCULPTURE IS ART, NOT FOOD. IT IS NOT EDIBLE.

Kids playing on the floor
Create Dough Sculptures

Welcome to the world of dough sculpture!

If you’re new to this popular creative activity, you’ll find that dough sculpture is not only great fun, but easy and inexpensive, too.
If you’re an old hand at dough art, this handbook will provide you with hundreds of new ideas for decorating with dough.
Whether you’re a novice or pro, this book can show you and your family how to put together lots of useful decorations for home, holidays, and gift-giving. Then you can let your imagination go and create your own original works of art.
Now, let’s step into the kitchen. Probably everything you’ll need is already there just waiting to mold or shape your ideas.
To get started, download a PDF of the Morton Salt Dough it Yourself® Handbook Rises Again.